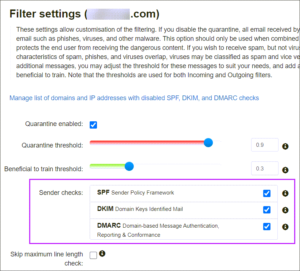
DMARC Quarantine Reject Policy
Do you know how to enable DMARC quarantine reject policy? This is a feature that can be helpful when other email servers treat the message as a spam or suspicious email. Setting it to full quarantine can reduce the chances of a malicious email making its way through the filter and ensuring that legitimate emails get to recipients. However, some organizations are more concerned about deliverability than security. In these cases, you should enable full quarantine.
5.7.5 permanent error evaluating dmarc policy
You should use a DMARC quarantine reject policy if you want to prevent spam or unwanted emails from being filtered into the Spam folder. This policy will reject emails that do not comply with the DMARC standard and will not be viewed by the recipient. The quarantine reject policy applies to emails that contain certain elements that are considered suspicious. You can increase this number by selecting a higher percentage.
Once you have enabled quarantine policy, you should configure it for all mails that you send. If you do not do this, you will get all legitimate emails to a spam folder. This is a good thing, but it can also lead to the bounced emails. You should choose a DMARC quarantine policy carefully to ensure that your emails are delivered. If you don’t use it properly, you could lose out on legitimate emails and customers.
How Do I Enable DMARC Quarantine Reject Policy?
DMARC is a great security feature for email programs. By making sure that the message’s From: header is genuine, you can avoid spoofing and impersonation. You can start by enabling a 10% reject policy and increasing it until you reach a 100% reject policy. As you increase the percentage of rejection, you’ll notice that your legitimate emails start to get rejected.
DMARC deployment is a long process, which can take anywhere from three months to one year depending on your email infrastructure and your 3rd party sources. Luckily, the EasyDMARC Support team is available to guide you through the configuration and enforcement process. The EasyDMARC team is here to help you achieve the 100% reject policy you’ve always dreamed of. We hope you enjoy your new security features!
A DMARC record contains a set of simple tags and optional values. Google lists the different advanced tags. The v= tag must be DMARC1, while the p= tag must be set to reject or quarantine. BIMI does not support the None tag. In addition, the rua= tag must be set to a dedicated mailbox for DMARC reports.
DMARC is a system that allows senders and receivers to share authentication information. Email providers like PayPal have pioneered this collaboration, and this has led to a significant drop in fraudulent PayPal emails. DMARC uses this collaboration to further improve security by allowing receivers to reject messages that are not authentic. If you’re looking for a new solution to protect your email inbox, try turning on DMARC quarantine reject policy.